
USA AMAZON SELLERS
How to Send Stock to Amazon USA FBA — Complete Inbound Shipping Guide
By Brandhunterz Ltd | Company No: 15342697 | 14 minute read
Affiliate Disclosure: This article contains affiliate links. If you purchase through our links we may earn a commission at no extra cost to you. We only recommend tools we genuinely use and believe in. Read our full disclaimer.
Sending your first shipment of wholesale products to an Amazon USA fulfilment centre is one of the most important practical milestones in launching your FBA business on Amazon.com. Getting the inbound shipping process right from the very first shipment — labelling every unit correctly packing every box to Amazon’s specifications creating an accurate shipment plan in Seller Central and choosing the right carrier — protects your inventory from rejection delays and unplanned service fees that can significantly erode the margin on your first order. The inbound shipping process for Amazon USA FBA follows a clear sequence of steps and while it involves several precise requirements around labelling packaging and box dimensions every requirement is entirely learnable and consistently repeatable once you have completed your first shipment correctly.
We are Brandhunterz Ltd — a UK registered wholesale sourcing company (Company No: 15342697) — and in this complete inbound shipping guide we walk through every step of the process of sending stock to Amazon USA FBA — from preparing your listings and printing FNSKU labels through to packing boxes correctly creating your shipment plan in Seller Central booking your carrier and tracking your inbound shipment through to inventory going live and available for sale in the Buy Box.
💡 Quick Summary
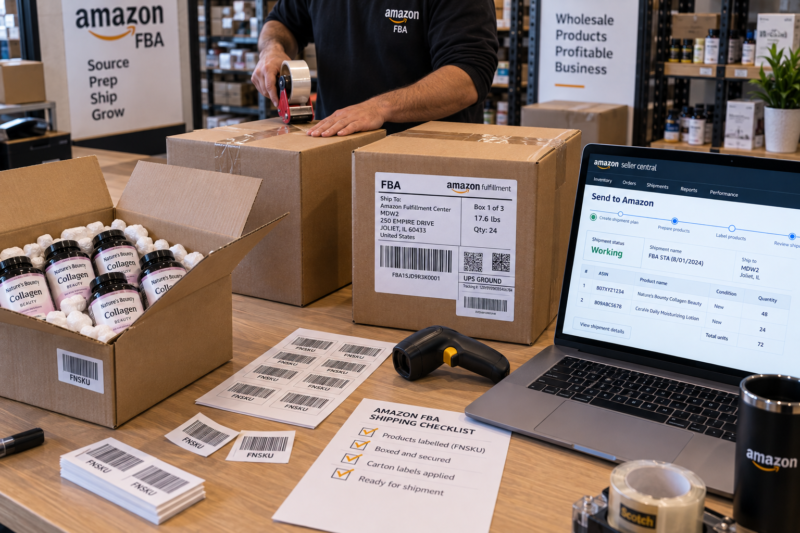
To send stock to Amazon USA FBA list your products in Seller Central and generate FNSKU barcode labels — print on standard 30-per-sheet label sheets and apply one label per unit covering the existing barcode. Pack labelled units into standard brown cardboard boxes under 50 lbs each and seal with H-tape. Create a shipment plan in Seller Central via Inventory — Send to Amazon — enter box contents dimensions and weights. Amazon assigns your shipment to one or more US fulfilment centres. Print and apply Amazon box labels. Book UPS collection through Amazon’s Partnered Carrier programme for discounted domestic shipping rates. Track the shipment to Receiving status in Seller Central — inventory becomes available to sell once checked in.
Before You Ship — FBA Prep Requirements Overview
Amazon USA has specific preparation requirements for every product sent to a US fulfilment centre. These requirements exist to ensure that every unit can be received sorted and stored accurately within Amazon’s automated fulfilment systems. Sending product that does not meet these requirements results in rejected deliveries unplanned service fees and delays that can leave your listings out of stock while Amazon processes the issue. The key requirements to understand before preparing your first shipment are:
| Prep Requirement | Detail |
|---|---|
| FNSKU labelling | Every unit must have an FNSKU barcode label applied — one per unit — covering or placed directly over the existing UPC or EAN barcode on the product packaging |
| Box weight limit | Each shipping box must weigh under 50 lbs — approximately 22.7 kg — standard FBA box requirement for Amazon USA |
| Box dimensions | No single side of the box may exceed 25 inches unless the shipment contains an item that itself is longer than 25 inches — standard boxes are typically 18x18x18 or 20x20x20 inches |
| Box sealing | All boxes must be sealed with H-tape — clear or brown packing tape applied in an H-pattern along all four seams on both the top and bottom of the box |
| Single-ASIN or mixed-ASIN boxes | Boxes may contain a single ASIN or multiple different ASINs — if sending mixed-ASIN boxes you must accurately record each ASIN and its quantity in the shipment plan for each box |
| Amazon box label | Each box must display the Amazon-generated FBA shipment label — printed from Seller Central and applied to the outside of the box — one label per box — covering any other carrier labels from incoming deliveries |
Step 1 — List Your Products in Seller Central
Before you can create a shipment plan your products must be listed in Seller Central as FBA listings. If the product already exists on Amazon USA you add your offer to the existing listing — you do not create a new listing. Here is how to add your offer and set up the listing correctly for FBA:
Search for the ASIN in Seller Central
Go to Catalogue — Add a Product in Seller Central. Search for the product using its ASIN UPC or product name. When the matching product appears click Sell this product. This adds your offer to the existing Amazon listing — you do not create a duplicate listing. If the product is not yet on Amazon USA you will need to create a new listing — but for most wholesale branded products the listing will already exist.
Select FBA as Your Fulfilment Method
When adding your offer select Fulfilled by Amazon as the fulfilment method — not Fulfilled by Merchant. This sets the listing up as an FBA offer which gives you Prime badge eligibility and Buy Box advantage. Enter your selling price — at or near the current Buy Box price as established in your Keepa research. Set your condition as New for wholesale products. Save the listing.
Print Your FNSKU Labels
Go to Inventory — Manage Inventory — find your listing — click the dropdown arrow next to Edit and select Print Item Labels. Select the quantity of labels you need — one per unit in your shipment. Print on standard Avery 5160 or equivalent 30-per-sheet label sheets on a standard laser or inkjet printer. FNSKU labels must be scannable — test scan a sample before applying to your full shipment. Each FNSKU label applied to a unit must completely cover the existing UPC or EAN barcode on the product packaging.
Step 2 — Label and Pack Your Products
With your FNSKU labels printed you are ready to prepare your units for FBA. This step involves applying labels to every unit packing them into shipping boxes and sealing boxes correctly before creating your shipment plan:
| Prep Action | Requirement |
|---|---|
| Apply FNSKU labels | One FNSKU label per unit — applied flat without wrinkles — fully covering the existing barcode — no part of the FNSKU barcode extending beyond the label edge — test scan every fifth label to confirm scannability |
| Inspect each unit | Check every unit for damage before packing — damaged or open packaging units should be set aside and not sent to FBA — Amazon checks condition on receipt and may reject damaged units |
| Pack into shipping boxes | Use clean undamaged brown cardboard shipping boxes — pack units with appropriate void fill to prevent movement — boxes must not rattle or flex when closed — units must not touch the inner walls of the box without padding |
| Keep boxes under 50 lbs | Weigh each box before sealing — if over 50 lbs redistribute units between boxes — boxes over 50 lbs require a Team Lift warning label — boxes over 100 lbs require a Mechanical Lift label |
| Seal with H-tape | Apply clear or brown packing tape in an H-pattern — one strip along the centre seam and one perpendicular strip at each end — on both the top and bottom of every box — do not use string rope or rubber bands to seal boxes |
| Record box dimensions and weights | Measure and weigh every box after packing and sealing — you will need exact dimensions and weights for the shipment plan in Seller Central — inaccurate box dimensions can result in carrier rate adjustments |
Step 3 — Create Your FBA Shipment Plan in Seller Central
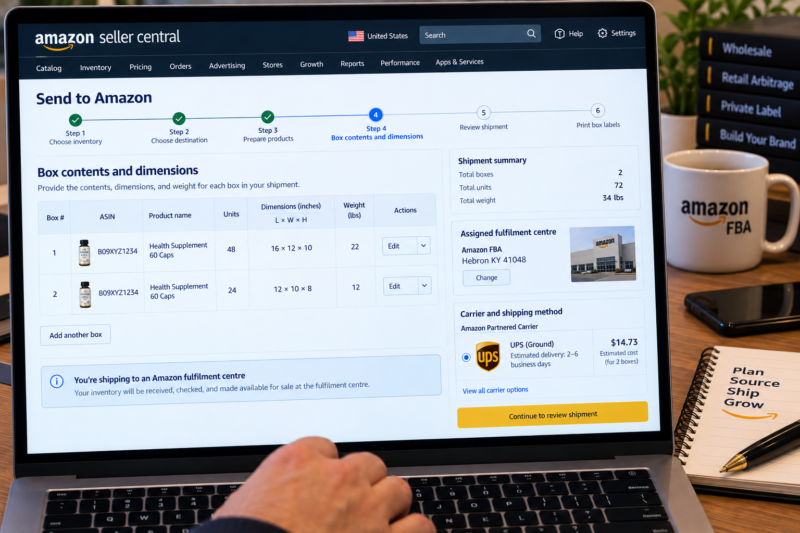
Once your products are labelled and packed go to Inventory — Send to Amazon in Seller Central to create your shipment plan. This is the process that tells Amazon which products you are sending how many units of each and how many boxes your shipment contains:
Select Products and Quantities
In Inventory — Send to Amazon select the ASINs you are including in this shipment and enter the quantity of each. The Send to Amazon workflow is the standard method for creating FBA shipment plans on Amazon USA. You can include multiple ASINs in a single shipment plan — each ASIN and its quantity must be entered accurately as Amazon uses this information to check in your inventory on receipt.
Confirm Prep and Labelling
The workflow asks how you are handling prep and labelling — select Merchant for both — confirming that you are preparing and labelling the products yourself rather than having Amazon do it at the fulfilment centre. Amazon’s prep service incurs a per-unit fee — seller prep is always more cost-effective for wholesale FBA sellers who are preparing their own stock.
Choose Your Inbound Placement Option
Amazon USA distributes FBA inventory across multiple fulfilment centres as part of their national inventory placement system. You will be presented with placement options — Amazon Optimised Placement distributes your inventory across their network at a lower per-unit cost but may split your shipment to multiple centres — Minimal Shipment Splits sends to fewer destinations but attracts a higher inbound placement service fee per unit. For new sellers sending their first shipments Amazon Optimised Placement is generally the more cost-effective choice.
Enter Box Contents and Dimensions
Enter the contents of each box — which ASINs and how many units of each are in each specific box. Then enter the dimensions and weight of each box. Accuracy here is critical — Amazon uses this information to verify your shipment on receipt and carrier rates are based on the dimensions and weights you declare. Measure dimensions in inches and weight in pounds for Amazon USA shipment plans.
Print Amazon Box Labels and Apply to Boxes
Once your shipment plan is confirmed print the Amazon-generated FBA box labels from Seller Central — one label per box. Apply one label to the outside face of each box — typically the largest flat side. The Amazon box label must be clearly visible and scannable. Cover or remove any previous carrier labels from when your wholesale supplier delivered the stock to you — old carrier labels confuse scanning at the Amazon fulfilment centre.
Step 4 — Book Your Carrier and Ship Your Boxes
Once your boxes are packed labelled and your shipment plan is confirmed you are ready to book your carrier and dispatch your boxes to Amazon’s US fulfilment centre. For sellers shipping domestically within the United States Amazon’s Partnered Carrier programme with UPS is the most cost-effective option. For international sellers shipping from outside the USA the process differs:
| Shipping Origin | Recommended Carrier Option | Key Considerations |
|---|---|---|
| Domestic USA — shipping within the USA | Amazon Partnered Carrier — UPS — booked directly through Seller Central at discounted rates | Most cost-effective option for US-based sellers — rates are significantly lower than booking UPS directly — charges are deducted from your account balance |
| International — shipping from outside the USA | Use a US prep centre to receive your international shipment and reship to Amazon FBA domestically — or ship directly to Amazon via a freight forwarder with experience in Amazon FBA inbound requirements | International shipments must clear US customs — work with a freight forwarder familiar with Amazon FBA requirements — using a US prep centre simplifies this significantly for sellers outside the USA |
Using Amazon’s Partnered Carrier — UPS — for Domestic USA Shipments
For sellers shipping from within the United States the Partnered Carrier programme is the standard and most economical way to get boxes from your location to Amazon’s fulfilment centres. Here is how to book it:
In the shipment plan workflow select Amazon Partnered Carrier as your shipping method — UPS is the standard partnered carrier for Amazon USA domestic shipments.
Enter your pickup address — Amazon generates UPS tracking labels for each box and the shipping cost is calculated based on your declared box dimensions and weights.
Print the UPS carrier labels generated by Seller Central and apply one to each box alongside the Amazon box label — the UPS label goes on the same face as the Amazon label.
Schedule a UPS collection from your location through the UPS website or by dropping boxes at a UPS Access Point location — the tracking numbers are already registered in your Seller Central shipment plan.
Step 5 — Track Your Shipment and Confirm Receipt
Once your boxes are dispatched track your inbound shipment through Seller Central until your inventory is received and made available for sale. Here are the shipment statuses you will see and what each means:
| Shipment Status | What It Means | Action Required |
|---|---|---|
| Working | Shipment plan created but boxes not yet picked up by carrier | Confirm UPS collection is booked — boxes ready for collection |
| Shipped | Carrier has collected boxes and shipment is in transit to Amazon’s fulfilment centre | Monitor UPS tracking — no action required during transit |
| Receiving | Boxes have arrived at the Amazon fulfilment centre and are being processed — units are being scanned checked and added to inventory | Monitor units received in Seller Central — check for any discrepancies as units are checked in |
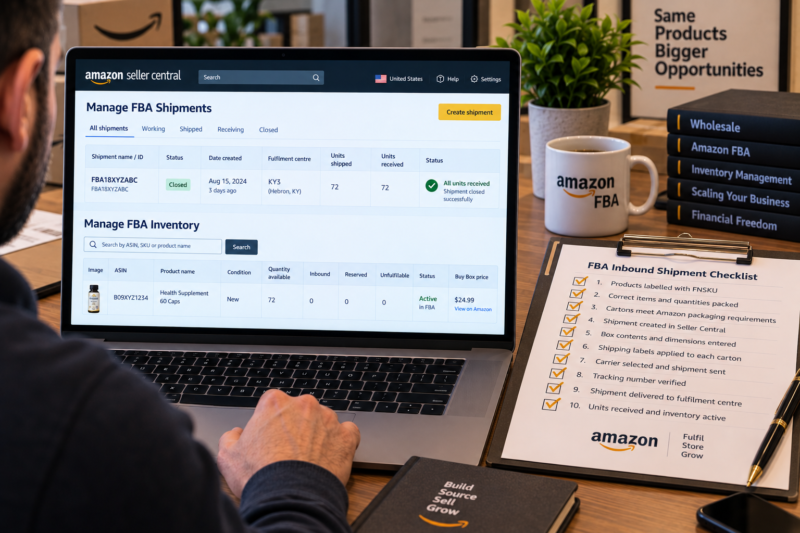
| Closed | All units received and added to FBA inventory — shipment processing complete — units are now available for sale in the Buy Box | Verify units received match units shipped — investigate any discrepancies immediately using the Reconcile option in Seller Central |
Common Inbound Shipping Mistakes to Avoid
| Mistake | Consequence | How to Avoid |
|---|---|---|
| FNSKU label not covering existing barcode | Amazon scans the wrong barcode — unit mislabelled or rejected — unplanned service fee applied | Apply FNSKU label directly over and completely covering the existing UPC or EAN barcode |
| Box weight over 50 lbs | Rejected at the receiving dock — boxes returned or held — shipment delayed | Weigh every box before sealing — redistribute units if over 50 lbs |
| Inaccurate box contents in shipment plan | Receiving discrepancies — units misassigned — manual reconciliation required and significant delay | Record contents of each box as you pack — enter exactly in the shipment plan before shipping |
| Old carrier labels not removed from boxes | Amazon scanner reads the wrong label — box misrouted within the fulfilment centre | Remove or completely cover all previous carrier labels before applying Amazon box labels |
| Sending to wrong fulfilment centre | Boxes rejected at the door — must be reshipped to the correct centre at seller’s cost | Always ship to the fulfilment centre address shown on the Amazon-generated box label — never guess or reuse a previous shipment address |
Your FBA Inbound Shipment Checklist
| FBA Inbound Shipment Step | Done |
|---|---|
| Products listed in Seller Central as FBA — selling price set at Buy Box rate | ☐ |
| FNSKU labels printed — one per unit — on 30-per-sheet label sheets | ☐ |
| All units inspected — no damaged or open packaging units included | ☐ |
| FNSKU label applied to every unit — existing barcode fully covered — sample scanned and confirmed | ☐ |
| Units packed into boxes with void fill — all boxes under 50 lbs — dimensions measured and recorded | ☐ |
| All boxes sealed with H-tape top and bottom — no loose flaps or open seams | ☐ |
| Shipment plan created in Seller Central — box contents dimensions and weights entered accurately | ☐ |
| Amazon box labels and UPS carrier labels printed and applied — old labels removed or covered | ☐ |
| UPS collection booked or boxes dropped at UPS Access Point — shipment status showing Shipped | ☐ |
| Shipment tracked to Receiving — units checked in monitored — discrepancies investigated | ☐ |
| Shipment status Closed — all units received — inventory live and available in Buy Box | ✅ Live |
Conclusion — A Correct First Shipment Makes Every Subsequent Shipment Easier
The inbound shipping process for Amazon USA FBA is one of the most procedural parts of running a wholesale FBA business — but it becomes fast and routine after your first correctly completed shipment. Every requirement exists for a clear operational reason within Amazon’s fulfilment system and following them precisely eliminates the fees delays and inventory problems that consistently affect sellers who cut corners in their prep. Label every unit correctly pack every box to specification create your shipment plan accurately and ship to the assigned fulfilment centre — and your inventory will arrive checked in and live in the Buy Box ready to generate sales within days of collection.
Find your next wholesale product through our Brands Directory. Research every opportunity with Keepa. Confirm every margin with AMZScout before placing your order.
SOURCE YOUR NEXT PRODUCT AND GET IT INTO FBA
Browse 5,000+ Verified Wholesale Brands Free
Find verified wholesale trade contacts in the Brandhunterz Brands Directory — source your products prep and label them correctly send your first FBA shipment and start selling on Amazon USA today.
About the Author
This article is written by the team at Brandhunterz Ltd — a UK registered Amazon FBA wholesale sourcing company (Company No: 15342697) registered in England and Wales since 2023. Visit brandhunterz.com to learn more.