
FBA PACKAGING AND SHIPPING
How to Ship Wholesale Stock From Supplier Directly to Amazon FBA
By Brandhunterz Ltd | Company No: 15342697 | 14 minute read
Affiliate Disclosure: This article contains affiliate links. If you purchase through our links we may earn a commission at no extra cost to you. We only recommend tools we genuinely use and believe in. Read our full disclaimer.
One of the most significant operational leaps a growing Amazon FBA wholesale seller can make is eliminating the step where stock passes through their own location entirely. In the standard self-prep model stock arrives from the supplier is labelled and packed at the seller’s home or business premises and then shipped to Amazon. This works well at low volumes — but as order sizes grow the time and space required to receive inspect label pack and reship hundreds or thousands of units becomes a genuine operational constraint. Shipping wholesale stock directly from your supplier to Amazon FBA — using a third-party prep centre as the intermediary — removes this constraint and allows your business to scale without requiring proportionally more of your personal time and space.
We are Brandhunterz Ltd — a UK registered wholesale sourcing company (Company No: 15342697) — and in this complete guide we explain exactly how direct-to-FBA shipping works what the realistic options are for making it work in practice what instructions your supplier and prep centre need from you and what quality control checks you must put in place when stock never passes through your hands before reaching the warehouse.
💡 Quick Summary
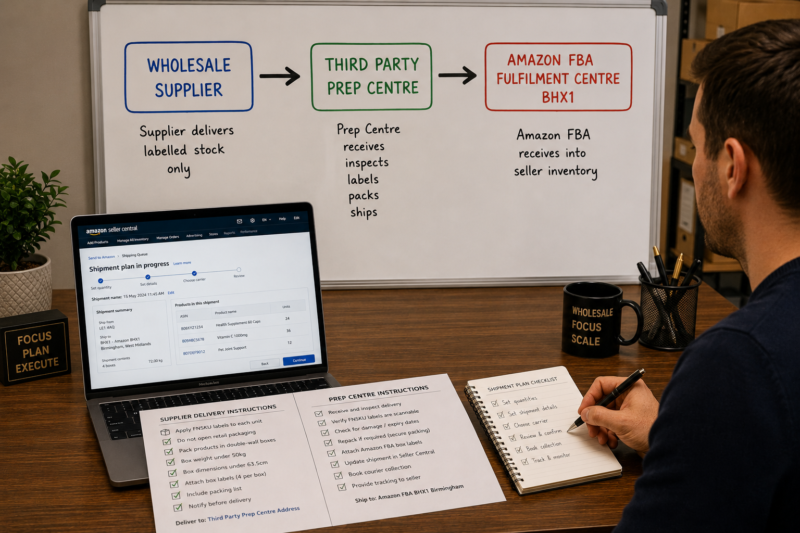
Direct supplier-to-FBA shipping works by routing your wholesale stock through a third-party prep centre instead of through your own location. Your supplier delivers to the prep centre — the prep centre receives inspects labels and packs your stock to Amazon’s requirements — and then ships directly to the assigned FBA fulfilment centre. You manage the entire process remotely — creating the shipment plan in Seller Central sending FNSKU labels and prep instructions to the prep centre and confirming dispatch once the prep centre notifies you the shipment has gone. This model requires clear written instructions to both your supplier and your prep centre before any stock moves.
The Two Realistic Routes for Direct Supplier-to-FBA Shipping
There are two distinct approaches to removing your own location from the fulfilment chain — and they suit different situations. Understanding the difference before choosing which to pursue saves significant time and avoids operational mistakes:
| Route | How It Works | Best For |
|---|---|---|
| Supplier → Prep Centre → FBA | Supplier delivers to a third-party prep centre — prep centre labels packs and ships to FBA on your behalf | Most wholesale sellers scaling beyond self-prep — products requiring standard or complex prep |
| Supplier → FBA Direct (Supplier Preps) | Supplier applies FNSKU labels and packs boxes to Amazon’s spec — ships direct to FBA using your shipment plan | Established supplier relationships — supplier is willing and capable of applying FNSKU labels correctly |
⚠️ Supplier Direct to FBA — Why Most Sellers Use a Prep Centre Instead
Asking a UK wholesale supplier to apply your FNSKU labels and pack to Amazon’s box requirements is rarely practical. Most wholesale suppliers are not familiar with Amazon’s prep and labelling standards and are not set up to apply individual unit barcodes. The risk of incorrect labelling non-compliant box packing or missed prep requirements is high — and the consequence falls entirely on your seller account. A professional prep centre exists specifically to handle this correctly. For most wholesale sellers the Supplier → Prep Centre → FBA route is the safer and more reliable option.
Step 1 — Set Up and Vet Your Prep Centre Relationship
Before routing any supplier delivery through a prep centre you need to establish a clear working relationship with a centre that can reliably handle your specific products. Not all prep centres are equal — turnaround times fee structures Amazon compliance knowledge and communication standards vary significantly between providers. Here is what to assess before committing stock to any prep centre:
| Prep Centre Assessment Criterion | What to Confirm |
|---|---|
| Amazon FBA compliance knowledge | Can they confirm FNSKU label placement standards box packing requirements and suffocation warning rules without being briefed? |
| Turnaround time from receipt to dispatch | Standard turnaround for standard label and pack — ask for a confirmed SLA in writing — typically 2 to 5 business days |
| Fee structure — per unit and per shipment | Per-unit receive fee per-unit label fee per-unit pack fee and per-shipment dispatch fee — get written quote for your product type |
| Minimum order or monthly minimum charge | Some prep centres require a minimum monthly throughput — confirm this fits your current volume |
| Inbound shipping rate to FBA from their location | Ask for their per-box or per-kg rate for FBA inbound — compare against Partnered Carrier rate from your own location |
| Communication and reporting process | How do they notify you when stock is received inspected and dispatched — email WhatsApp portal — confirm before onboarding |
Step 2 — Create Your Shipment Plan in Seller Central First
The shipment plan must be created in Seller Central before any stock moves — whether from supplier to prep centre or from prep centre to FBA. The shipment plan is what generates the FNSKU labels and the FBA box labels that the prep centre needs to complete its work. Creating the plan first also tells you which fulfilment centre Amazon has assigned so you can communicate the correct delivery address to your prep centre before they book the outbound courier.
Enter the Prep Centre Address as Your Ship From Address
When creating the shipment plan in Seller Central enter the prep centre’s address as your Ship From address — not your own home or business address. This is important because the Ship From address determines which fulfilment centre Amazon assigns to receive the shipment and affects the Partnered Carrier rate calculation. Using the correct ship from address ensures the fulfilment centre assigned is the one geographically appropriate for the prep centre’s location.
Enter Products Quantities and Confirm Merchant Labelling
Add all ASINs with their exact unit quantities — confirm Merchant for both labelling and prep so that the prep centre performs these tasks rather than Amazon. The prep centre is the merchant in this context — they are applying your labels and performing your prep on your behalf. Never select Amazon for labelling or prep when using a prep centre — this would send unlabelled units to FBA and trigger Amazon’s labelling fee rather than your prep centre doing the work.
Download and Send FNSKU Labels to Your Prep Centre
Download the FNSKU label PDF from your shipment plan and send it to the prep centre along with your prep instruction sheet — see Step 3 below. The prep centre will print the labels on their label printer and apply them to every unit on your behalf. Some prep centres have online portals where you can upload label files directly — others work via email. Confirm the file transfer method with your prep centre before your first order ships.
Note the Assigned Fulfilment Centre Address for the Prep Centre
The shipment plan shows you the exact fulfilment centre Amazon has assigned to receive your stock — including the address and the FBA facility code such as BHX1 or MAN1. Send this address to your prep centre so they can book their outbound courier correctly. Never leave the prep centre to guess or look up the destination — provide it explicitly as part of your shipment instruction pack.
Step 3 — Send Your Supplier a Delivery Instruction Sheet
When your supplier is delivering to a prep centre rather than to your own address you must give them clear written delivery instructions. Your supplier is not an Amazon expert and will not know the prep centre’s specific receiving requirements or booking procedures without being told. A clear one-page delivery instruction sheet sent with every purchase order eliminates the majority of delivery complications:
SUPPLIER DELIVERY INSTRUCTION SHEET — TEMPLATE
| Field | Information to Provide |
| Delivery address | Full prep centre address including postcode and any unit or dock number |
| Prep centre contact name | The prep centre contact person’s name and phone number for delivery queries |
| Reference on delivery | Your name or business name plus the purchase order number to quote on delivery documentation |
| Delivery booking requirement | Whether the prep centre requires a pre-booked delivery slot — most do — confirm with your prep centre first |
| Expected unit count | Total units by ASIN so the prep centre can verify count on receipt against what you have declared |
| What not to do | Instruct your supplier not to apply any labels or stickers to the products — all labelling is handled by the prep centre only |
Step 4 — Send Your Prep Centre a Complete Prep Instruction Sheet
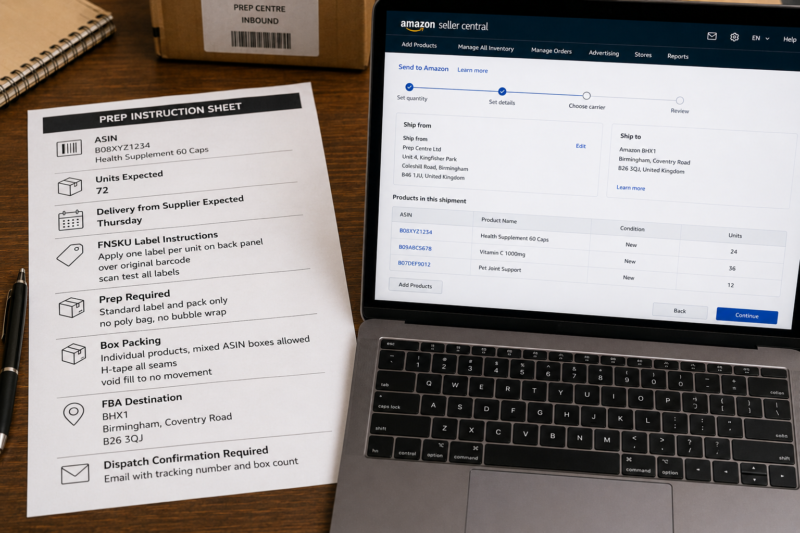
Your prep centre needs a complete written brief for every order they handle on your behalf. Never assume a prep centre knows your specific product requirements — always provide explicit instructions even for repeat orders unless you have a standing instruction on file with them that has been confirmed as current. Here is what every prep instruction sheet must include:
| Instruction Category | What to Specify |
|---|---|
| Product identification | ASIN — product name — unit count — expected delivery date from supplier |
| FNSKU label instructions | Apply one FNSKU label per unit — flat on the back panel over the original barcode — scan-test every label — label PDF attached |
| Additional prep required | Poly bagging required or not — bubble wrapping required or not — expiry date check required or not — set label required or not |
| Box packing instructions | Individual Products packing — mixed ASIN boxes allowed — maximum box weight 50kg — H-tape all seams — void fill to no-movement standard |
| Box content entry | Specify whether you will enter box contents in Seller Central yourself once the prep centre confirms packed box dimensions and weights — or provide a login for a prep centre portal if applicable |
| FBA destination address | Full fulfilment centre address from your Seller Central shipment plan including FBA facility code |
| Dispatch confirmation required | Request email or message confirmation when shipment leaves — including tracking number and number of boxes dispatched |
Step 5 — Manage Box Content Entry Remotely
Box content information must be entered in Seller Central before the shipment is dispatched to FBA — even when the packing is being done by a prep centre. There are two ways to handle this when working remotely:
| Box Content Method | How It Works | Recommended |
|---|---|---|
| Prep centre sends box content report — you enter in Seller Central | Prep centre sends a spreadsheet or message listing ASIN quantity and dimensions per box — you enter this in Seller Central and print box labels for the prep centre to apply | ✅ Best for most sellers |
| Prep centre enters box content via Seller Central file upload | You provide prep centre with access to Seller Central — they complete box content entry and print box labels directly — you review and confirm before dispatch | ⚠️ Requires trust and access controls |
Step 6 — Confirm Dispatch and Mark Shipment as Shipped
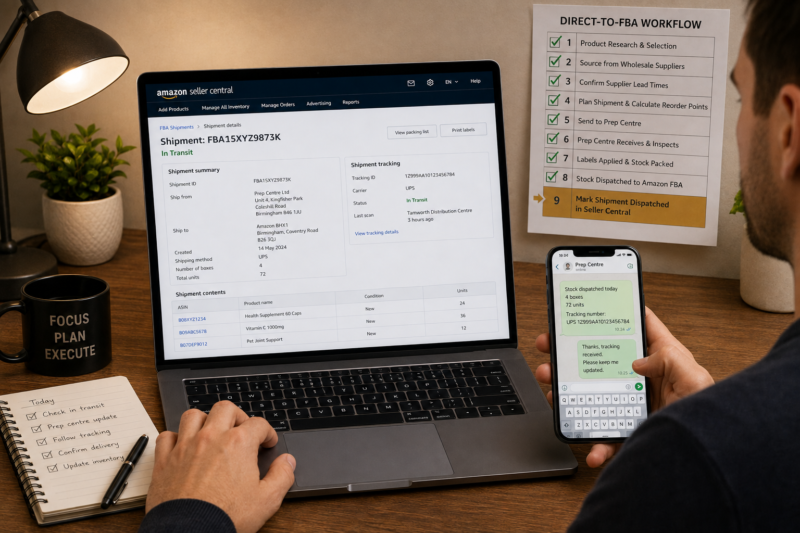
Once your prep centre confirms that the shipment has been dispatched — providing you with the courier tracking number and the number of boxes sent — return to Seller Central and mark the shipment as dispatched. Enter the tracking number and carrier name into the shipment record. This updates your shipment status from Working to Shipped and triggers Amazon’s receiving timeline. Monitor the shipment tracking until it shows as delivered at the fulfilment centre and then track the receiving status until it shows as Closed.
Quality Control When Stock Never Passes Through Your Hands
The most significant risk of the supplier-to-FBA model is the loss of direct quality control. When stock passes through your own location you see every unit — you catch damaged packaging wrong products short deliveries and labelling issues before they reach the warehouse. When stock goes directly from supplier to prep centre to FBA you must replace that direct inspection with a set of systematic controls that give you equivalent protection remotely:
| Quality Control Layer | How to Implement It |
|---|---|
| Prep centre unit count confirmation on receipt | Require your prep centre to confirm the unit count received from the supplier within 24 hours of delivery — compare against your purchase order |
| Damage and defect reporting from prep centre | Instruct your prep centre to photograph and report any damaged units missing items or packaging issues before labelling — never label and send damaged units |
| Photo confirmation of labelling sample | Request a photograph of several labelled units before full batch labelling is completed — confirm FNSKU placement and label quality visually |
| Receiving discrepancy monitoring in Seller Central | Check every shipment’s receiving quantity against the quantity dispatched once the shipment closes — flag any discrepancy immediately |
| First order physical inspection before going fully remote | For a new prep centre send your first order to your own address and inspect it before routing to FBA — confirm prep quality before trusting the centre with direct delivery |
The Complete Direct-to-FBA Workflow Summary
| Step | Who Acts | What Happens |
|---|---|---|
| 1 | You — Seller Central | Create shipment plan using prep centre address as Ship From — download FNSKU labels — note assigned fulfilment centre |
| 2 | You — Supplier Communication | Send purchase order with delivery instruction sheet — prep centre address — contact name — reference number — booking requirement |
| 3 | You — Prep Centre Communication | Send prep instruction sheet — FNSKU label PDF — FBA destination address — expected delivery date and unit count |
| 4 | Supplier | Delivers stock to prep centre — quotes your reference on delivery documentation — prep centre signs for the goods |
| 5 | Prep Centre | Receives and counts stock — reports unit count to you — flags any damage or discrepancy — awaits your confirmation to proceed |
| 6 | Prep Centre | Applies FNSKU labels to every unit — performs all required prep — scan-tests labels — packs boxes to Amazon requirements |
| 7 | Prep Centre → You | Sends box content report — ASIN quantity and dimensions per box — you enter box contents in Seller Central and send box labels back |
| 8 | Prep Centre | Applies box labels — books courier — dispatches to assigned Amazon fulfilment centre — sends you tracking number and dispatch confirmation |
| 9 | You — Seller Central | Mark shipment as dispatched — enter tracking number — monitor receiving status until shipment closes and inventory goes live |
| ✅ | Stock live in FBA — inventory available for sale — your time investment was creation of instructions and Seller Central steps only | |
When This Model Makes Commercial Sense
The direct supplier-to-FBA model is not the right choice for every seller at every stage. Here is a clear framework for when to make the transition:
| Situation | Direct to FBA via Prep Centre |
|---|---|
| New seller — first 3 months — under 200 units per week | ❌ Too early — self-prep first |
| Growing seller — 200 to 500 units per week — time pressured | ⚠️ Consider — cost vs time trade-off |
| Scaling seller — over 500 units per week — self-prep unsustainable | ✅ Strong candidate — transition now |
| Full-time job alongside FBA — limited prep time regardless of volume | ✅ Good option even at lower volumes |
| Margins too tight to absorb prep centre fees | ❌ Stay on self-prep — protect margin |
Conclusion — Direct to FBA Is a Scalability Tool Not a Shortcut
Shipping wholesale stock directly from your supplier to Amazon FBA via a prep centre is not a way to skip the hard work of understanding your product requirements and prep standards — it is a way to delegate that work professionally once you understand it well enough to brief someone else on it correctly. The sellers who transition to this model successfully are those who have already mastered the prep process themselves — who know exactly what their products require how to write the instructions and what receiving discrepancies to watch for. Master self-prep first then scale through a prep centre when your volume demands it.
Find your next wholesale brand through our Brands Directory. Research every opportunity with Keepa. Confirm every margin with AMZScout. And when your volume is ready use the direct-to-FBA process in this guide to scale without limits on your time.
FIND YOUR NEXT WHOLESALE BRAND AND SCALE TO FBA
Browse 5,000+ Verified Wholesale Brands Free
Find verified wholesale trade contacts in the Brandhunterz Brands Directory — source your product apply for your account and build a direct supplier-to-FBA operation using the complete process in this guide.
About the Author
This article is written by the team at Brandhunterz Ltd — a UK registered Amazon FBA wholesale sourcing company (Company No: 15342697) registered in England and Wales since 2023. Visit brandhunterz.com to learn more.