
FBA PACKAGING AND SHIPPING
How to Avoid Amazon FBA Shipment Rejections and Warehouse Errors
By Brandhunterz Ltd | Company No: 15342697 | 14 minute read
Affiliate Disclosure: This article contains affiliate links. If you purchase through our links we may earn a commission at no extra cost to you. We only recommend tools we genuinely use and believe in. Read our full disclaimer.
Amazon FBA shipment rejections and warehouse errors are among the most frustrating and costly problems a wholesale seller can face. A rejected box means your stock cannot be received — it either sits at the fulfilment centre dock awaiting correction instructions or gets returned to you at your cost with no sale made and your capital tied up in transit. A warehouse error — where Amazon receives fewer units than you sent or assigns received units to the wrong account — triggers an investigation process that can take weeks to resolve and during which your inventory is inaccessible. Both problems are almost entirely preventable when you understand the specific causes and build the right checks into your preparation process before every shipment leaves your hands.
We are Brandhunterz Ltd — a UK registered wholesale sourcing company (Company No: 15342697) — and in this complete guide we cover every major cause of FBA shipment rejections and warehouse errors — what triggers them what Amazon does in response and the exact preparation steps that eliminate each problem before your shipment ever leaves your location.
💡 Quick Summary
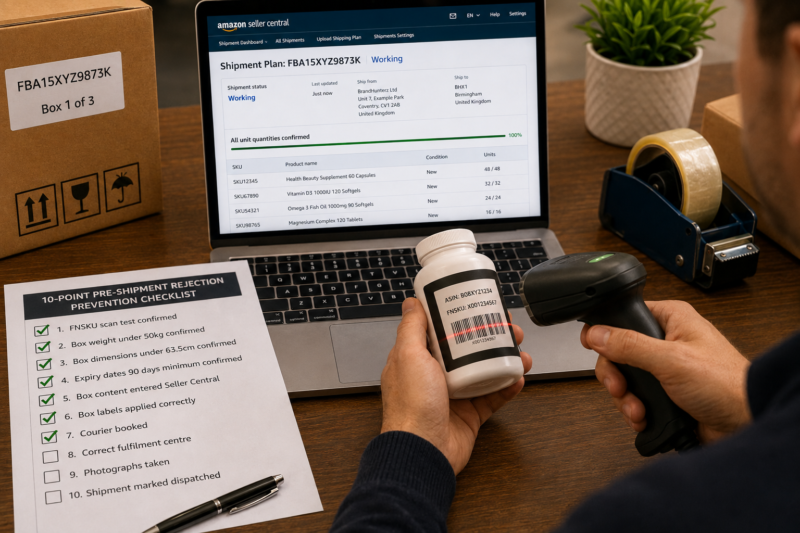
FBA shipment rejections are caused by missing or unreadable FNSKU labels boxes over the weight or size limit non-compliant packaging on individual units expired products and shipments sent to the wrong fulfilment centre. Warehouse errors are caused by quantity mismatches between the shipment plan and the actual box contents missing box content information and box label mix-ups. Every single one of these problems is preventable before dispatch through a consistent pre-shipment checklist covering labels box contents weights dimensions and routing confirmation.
The Difference Between a Rejection and a Warehouse Error
Before covering the individual causes it is important to understand the distinction between these two types of problems — because they occur at different points in the fulfilment process and have different consequences and resolution paths:
| Problem Type | When It Occurs | Immediate Consequence | Resolution Timeline |
|---|---|---|---|
| Shipment Rejection | At the receiving dock — before units are processed | Box refused — returned to sender or held pending seller instruction | Days to weeks — return shipping plus repack and resend |
| Warehouse Error | During or after receiving — once units are partially or fully processed | Discrepancy flagged — units held or short-received — investigation opened | Weeks to months — investigation required with documentation |
Rejection Cause 1 — Missing or Unreadable FNSKU Labels
The most common cause of unit-level rejection at Amazon FBA is a missing unreadable or incorrectly applied FNSKU label. Units that arrive at the fulfilment centre without a scannable FNSKU on their outermost surface cannot be received into your inventory — Amazon has no way to identify who sent the product or which seller account to assign it to. These units are either held for relabelling at your cost or returned to the sender.
| FNSKU Label Failure | Cause | Prevention |
|---|---|---|
| Label missing entirely | Unit packed before labelling — labelling step skipped in error | Count labelled units against plan quantity before boxing — never pack unlabelled units |
| Label not scannable — smudged or blurred print | Inkjet printer used — toner low — print settings scaled rather than 100 percent | Use laser or thermal printer — scan-test first label before bulk printing — always print at 100 percent scale |
| Label peeled off in transit | Applied to curved surface — poor adhesion — label edges lifting at time of application | Apply only to flat surfaces — press firmly from centre outward — check edges fully adhered |
| Original barcode not covered — scan conflict | FNSKU applied beside rather than over original barcode — original barcode still scannable | Position FNSKU directly over original barcode — cover completely — use opaque sticker if barcode is larger than FNSKU |
| Label applied inside poly bag or under wrap | Unit labelled before bagging — FNSKU inside bag or under bubble wrap | Always apply FNSKU to outermost surface — label goes on the poly bag exterior not the product inside |
Rejection Cause 2 — Box Over Weight or Size Limit
Boxes that exceed Amazon’s 50kg gross weight limit or 63.5cm maximum dimension on any single side are refused at the fulfilment centre receiving dock. There are no exceptions and no grace margins — a box that is 51kg or 64cm in any direction is refused and returned. This is one of the most preventable rejection causes because it requires only a scale and a tape measure to confirm before dispatch.
| Limit Exceeded | Most Common Cause | Prevention |
|---|---|---|
| Over 50kg gross weight | Dense products — heavy stock — too many units per box — void fill not accounted for in weight estimate | Weigh every fully packed sealed box before labelling — split into two boxes if over limit |
| Over 63.5cm any side | Using large supplier or manufacturer boxes without checking dimensions — long or flat products | Measure all three sides of every box before packing — use appropriately sized shipping boxes |
Rejection Cause 3 — Expired Products or Insufficient Shelf Life
For food grocery supplements and health products Amazon requires a minimum of 90 days remaining shelf life from the date the shipment arrives at the fulfilment centre. Products with less than 90 days are refused and either returned to the seller or disposed of. This rejection is particularly damaging because it typically affects an entire category of units in the shipment — not just one or two — and the cost of return shipping on a large quantity of expired food or supplement stock is significant.
| Expiry Issue | Prevention |
|---|---|
| Product expires within 90 days of FBA arrival | Check every unit’s expiry date when stock arrives from supplier — account for transit time when calculating remaining shelf life |
| Expiry date not visible or not in correct format | Apply a supplementary expiry date sticker in MM-YYYY format — confirm it is visible on the outermost surface before boxing |
| Supplier sends batch with short remaining shelf life | Specify minimum shelf life requirement on every purchase order — reject and return any non-compliant batch before sending to FBA |
Rejection Cause 4 — Non-Compliant Unit Packaging
Products that require additional prep — poly bagging suffocation warning labels bubble wrapping or set labelling — and arrive at the fulfilment centre without that prep will be refused at unit level. Amazon identifies prep requirements for specific product types during the shipment plan creation process and holds sellers accountable for meeting them. Units that arrive needing prep they do not have will either be returned or held for Amazon’s prep service at the seller’s expense.
| Missing Prep Type | Products Affected | Prevention |
|---|---|---|
| Missing poly bag | Loose or powder products — multi-part sets — fabric items without retail packaging | Check prep requirements in shipment plan — poly bag every required unit before boxing |
| Missing suffocation warning on poly bag | Any poly bag with opening over 12.7cm | Use pre-printed poly bags with suffocation warning — or apply warning sticker to every bag |
| Missing bubble wrap on fragile units | Glass ceramic delicate electronics | Wrap all fragile units individually — minimum 2 inches bubble wrap on all sides — confirmed before boxing |
| Missing Sold as Set label on bundle | Any multi-component product sold as one unit | Apply Sold as Set — Do Not Separate label to outer packaging of every bundle before shipping |
Rejection Cause 5 — Shipment Sent to Wrong Fulfilment Centre
Amazon assigns a specific fulfilment centre to receive each shipment based on your ship from address product type and its network capacity at the time the plan is created. If your boxes are delivered to a different fulfilment centre than the one assigned — whether because you changed the delivery address instructed a courier to use a different destination or your courier misrouted the shipment — Amazon will either redirect the boxes at your cost or refuse them entirely. Never change the destination of an FBA shipment after the plan has been confirmed.
Warehouse Error Cause 1 — Quantity Mismatch Between Plan and Box Contents
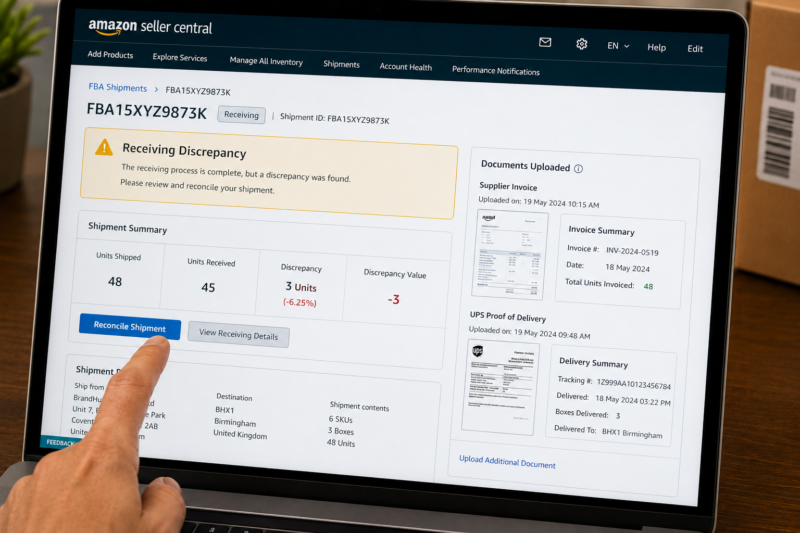
The most common cause of warehouse receiving errors is a discrepancy between the unit quantity declared in the shipment plan and the actual number of units found in the boxes at receiving. Amazon scans every unit it receives and reconciles the count against your declared quantity. Any difference — even a single unit — triggers a receiving discrepancy investigation that freezes the affected inventory and requires seller action to resolve.
| Quantity Mismatch Cause | Prevention |
|---|---|
| Entered wrong quantity in shipment plan | Count stock before opening Seller Central — enter the exact counted quantity — not an estimated figure |
| Supplier delivered fewer units than invoiced | Count every unit on arrival from supplier — match against invoice before creating shipment plan |
| Unit damaged and removed but plan not updated | Remove damaged units from count before entering plan quantity — never pad or round the figure |
| Unit lost during packing — fell behind furniture or under desk | Count labelled units immediately before boxing — count again after all boxes sealed and weighed |
Warehouse Error Cause 2 — Missing or Incorrect Box Content Information
When box content information is not entered in Seller Central before dispatch Amazon must manually scan every unit in every box to determine what is inside them. This process is slow generates a per-unit compliance fee and significantly increases the risk of receiving errors because manual scanning at speed is less accurate than system-guided receiving. Always enter box content information for every box in every shipment without exception — it is one of the highest-impact steps in the entire shipment preparation process.
| Box Content Error | Consequence | Prevention |
|---|---|---|
| No box content entered — skipped | Manual scan compliance fee per unit — increased error risk — delay in going live | Complete box content entry for every box before confirming shipment — never skip |
| Declared quantity does not match actual box contents | Receiving discrepancy — investigation — potential charge for unresolved discrepancy | Enter box content quantities only after physically packing and counting each box |
| Wrong ASIN entered for box contents | Units received against wrong ASIN — misattributed inventory — difficult to correct post-receiving | Verify ASIN from Seller Central listing — do not type from memory — copy from the shipment plan |
Warehouse Error Cause 3 — Box Label Mix-Up
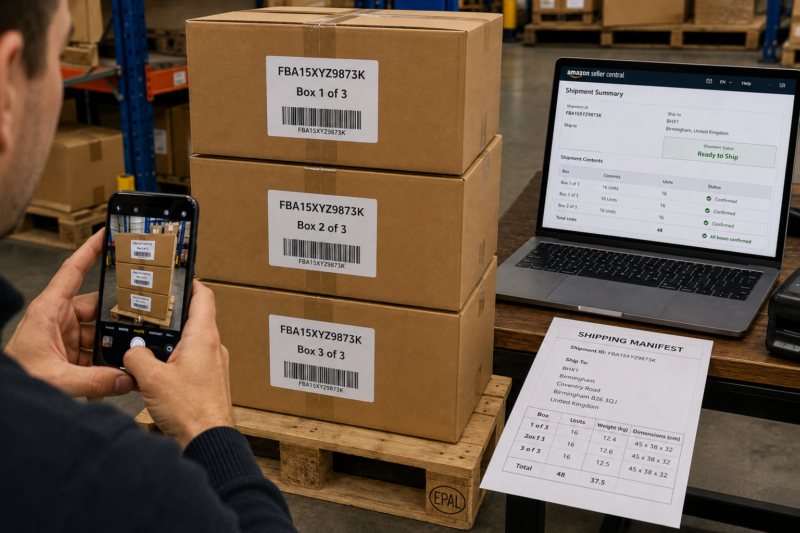
Each box in your shipment has a unique numbered box label — Box 1 Box 2 Box 3 and so on. Each label is associated in Amazon’s system with the specific contents declared for that numbered box. When the wrong label is applied to the wrong box — Box 2’s label on Box 1 and Box 1’s label on Box 2 — the declared contents do not match the actual contents of the scanned box. Amazon flags this as a receiving discrepancy even though no units are actually missing — because its system cannot reconcile what was declared against what it received under that box label.
| Box Label Error | Prevention |
|---|---|
| Wrong box label applied to wrong box | Print and apply box labels one at a time — apply Box 1 label immediately to Box 1 before printing Box 2 — never batch print all labels and apply separately |
| Box label applied to wrong side — obscured or damaged | Apply each box label to the largest flat face — away from seams — confirm it lies flat and reads cleanly before sealing the box in the stack |
| Two box labels on one box — duplicate applied in error | Check each box has exactly one box label before stacking — remove any duplicate immediately and replace with single correct label |
How to Resolve a Receiving Discrepancy When One Occurs
Even with the best preparation process in place receiving discrepancies do occasionally occur — particularly on high-volume shipments or when working with new products. When a discrepancy appears in your Seller Central shipment status here is the resolution process to follow:
Wait for the Shipment Status to Show Closed
Do not raise a discrepancy case while the shipment is still showing Receiving status. Amazon’s receiving process takes 1 to 5 business days to complete and units that appear short-received at an intermediate stage often reconcile fully once all boxes in the shipment have been processed. Only raise a case after the shipment status shows Closed and the discrepancy is confirmed.
Gather Your Evidence Before Opening a Case
Before contacting Amazon gather your shipment documentation — the purchase order from your supplier the supplier invoice showing the unit count the courier booking confirmation and tracking proof of delivery to the correct fulfilment centre and any photos you took of your packed boxes before dispatch. This documentation is what Amazon’s investigation team uses to verify your claim.
Open a Case in Seller Central Using the Shipment ID
Navigate to your Manage FBA Shipments page in Seller Central find the closed shipment with the discrepancy and click Reconcile Shipment. Follow the prompts to submit your claim with the units short-received the shipment ID and your supporting documentation. Amazon typically responds within 7 to 14 business days with either a reimbursement for confirmed lost units or a request for additional documentation.
Photograph Packed Boxes Before Every Shipment
Building a habit of photographing your packed and labelled boxes before they are collected by the courier takes under a minute per shipment and provides invaluable evidence if a receiving discrepancy is ever raised. Photograph the box label clearly readable the stack of sealed boxes and where possible the open box contents before sealing. These photographs combined with your supplier invoice make discrepancy cases significantly easier to resolve in your favour.
The Complete Pre-Shipment Rejection and Error Prevention Checklist
| Pre-Shipment Check | Prevents | Done |
|---|---|---|
| Scan-test FNSKU label sample before bulk application | Unreadable label rejection at unit level | ☐ |
| Count labelled units before boxing — match against plan quantity | Quantity mismatch warehouse error | ☐ |
| Confirm FNSKU applied on outermost surface — not inside bag or wrap | FNSKU unreadable at receiving — unit held | ☐ |
| Check expiry dates on all applicable units — minimum 90 days confirmed | Expired product rejection | ☐ |
| Poly bag suffocation warning and set labels applied where required | Non-compliant packaging rejection | ☐ |
| Every box weighed — under 50kg confirmed — every box measured — under 63.5cm confirmed | Box rejection at receiving dock | ☐ |
| Box content entered for every box — ASIN quantity and dimensions | Box content compliance fee and warehouse error | ☐ |
| Correct numbered box label applied to correct numbered box | Box label mix-up warehouse error | ☐ |
| Courier booked to correct assigned fulfilment centre address | Wrong destination rejection | ☐ |
| Photographs taken of labelled boxes and box labels before collection | Evidence gap if discrepancy investigation required | ☐ |
| All checks passed — shipment ready for collection | ✅ Go | |
Conclusion — Prevention Is Always Faster and Cheaper Than Resolution
Every rejection and every warehouse error costs more to resolve than it would have cost to prevent. Return shipping on a rejected box typically exceeds the original inbound courier cost. A warehouse discrepancy investigation can take weeks and freeze your inventory at a time when you need it live and generating sales. The pre-shipment checklist in this guide takes under ten minutes to complete per shipment and eliminates the vast majority of rejection and error causes before your boxes ever leave your location. Make it a non-negotiable part of every single shipment without exception.
Find your next wholesale brand through our Brands Directory. Research every product with Keepa. Confirm every margin with AMZScout. And protect every shipment with the prevention checklist in this guide.
FIND YOUR NEXT WHOLESALE BRAND TO SHIP WITH CONFIDENCE
Browse 5,000+ Verified Wholesale Brands Free
Find verified wholesale trade contacts in the Brandhunterz Brands Directory — source your product apply for your account and ship every FBA shipment rejection-free using the process in this guide.
About the Author
This article is written by the team at Brandhunterz Ltd — a UK registered Amazon FBA wholesale sourcing company (Company No: 15342697) registered in England and Wales since 2023. Visit brandhunterz.com to learn more.