
FBA PACKAGING AND SHIPPING
How to Create an FBA Shipment Plan in Seller Central — Step by Step
By Brandhunterz Ltd | Company No: 15342697 | 13 minute read
Affiliate Disclosure: This article contains affiliate links. If you purchase through our links we may earn a commission at no extra cost to you. We only recommend tools we genuinely use and believe in. Read our full disclaimer.
Creating an FBA shipment plan in Amazon Seller Central is a mandatory step before you can send any wholesale stock to an Amazon fulfilment centre. Without a confirmed shipment plan Amazon cannot assign a receiving location for your stock cannot associate your boxes with your inventory and cannot process your units when they arrive at the warehouse. Many new sellers treat the shipment plan as a simple administrative task — but it is one of the most detail-sensitive parts of the entire FBA process. Errors in your shipment plan such as incorrect unit quantities wrong packing types or missing box content information lead directly to receiving discrepancies compliance fees and delays in your stock going live for sale.
We are Brandhunterz Ltd — a UK registered wholesale sourcing company (Company No: 15342697) — and in this complete step by step guide we walk you through every stage of creating an FBA shipment plan in Seller Central — from navigating to the Send to Amazon workflow through selecting products entering quantities confirming prep and labelling options entering box contents printing shipping labels and confirming your shipment as dispatched.
💡 Quick Summary
Creating an FBA shipment plan in Seller Central has eight stages — navigating to Send to Amazon entering your ship from address selecting products and quantities confirming labelling and prep options reviewing Amazon’s destination fulfilment centre assignment entering box contents and dimensions printing and applying box labels and confirming dispatch. The entire workflow is completed inside Seller Central before any stock leaves your location. Rushing or skipping steps — particularly box content entry — creates receiving problems that are time-consuming and costly to resolve.
Before You Start — What Must Be in Place
Before beginning a shipment plan in Seller Central confirm that the following are in place. A missing item at any of these points will stop the shipment plan workflow at a specific step and require you to resolve the issue before proceeding:
| Pre-Requisite | Why It Is Required | Status |
|---|---|---|
| Active Professional Seller Central account | Individual plan does not support FBA shipment creation | ☐ |
| Product listed as FBA in your inventory | Products must be converted to FBA fulfilment before a shipment plan can be created for them | ☐ |
| Stock physically received and counted | You must know the exact unit count before entering quantities in the shipment plan | ☐ |
| Product not gated or gating resolved | Gated products must be approved before FBA shipment can be created | ☐ |
| Ship from address confirmed | Required to assign the correct fulfilment centre and calculate partnered carrier rates | ☐ |
Step 1 — Navigate to Send to Amazon in Seller Central
Log In to Seller Central and Go to Manage FBA Inventory
Go to sellercentral.amazon.co.uk and log in. Click Inventory in the top navigation bar and select Manage FBA Inventory from the dropdown. This shows all products in your FBA inventory. Each row represents a different product listing — find the product you want to create a shipment plan for.
Click Send or Replenish Inventory
In the row for your target product click the dropdown arrow in the Actions column on the right side of the page. Select Send or Replenish Inventory from the dropdown. This takes you into the Send to Amazon workflow — Amazon’s current shipment plan creation interface. If you have multiple products to include in the same shipment you can add additional ASINs inside the workflow rather than starting a separate plan for each one.
Step 2 — Enter Your Ship From Address
The first screen in the Send to Amazon workflow asks for your Ship From address. This is the address from which your boxes will be collected or dropped off for delivery to Amazon. Enter this accurately — it determines which Amazon fulfilment centre receives your shipment and affects the shipping rate calculation for Amazon’s Partnered Carrier programme.
| Ship From Address Type | When to Use |
|---|---|
| Home address | Most new wholesale sellers preparing shipments from home — standard choice for small volume sellers |
| Business premises address | Sellers operating from a warehouse or office — use the physical address where stock is held |
| Prep centre address | When using a third-party prep centre to label and pack your FBA shipments — use the prep centre’s address |
| Supplier address — direct shipment | When arranging direct shipment from supplier to Amazon — use supplier address and confirm prep arrangements |
Step 3 — Add Products and Enter Unit Quantities
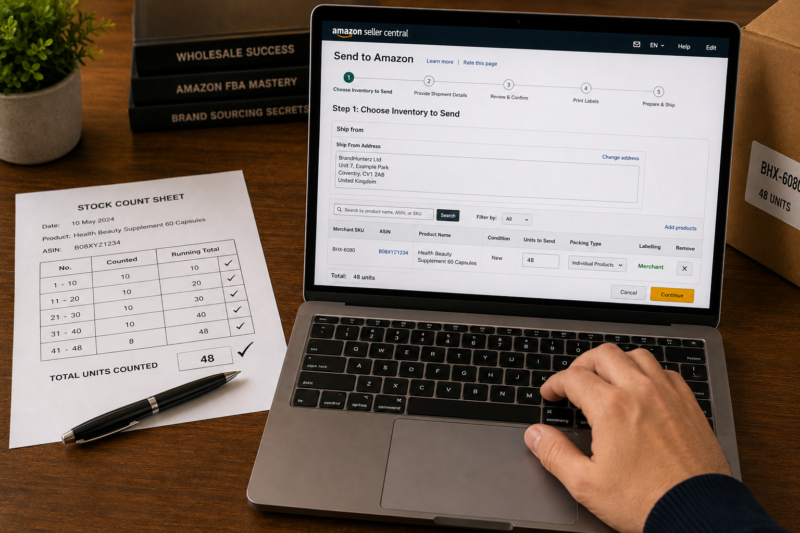
The Step 1 screen of the Send to Amazon workflow is titled Choose Inventory to Send. Here you confirm which products and how many units of each you are including in this shipment. This is one of the most critical data entry points in the entire workflow — the quantities you enter here must match exactly the number of labelled units you place in your boxes.
Select Individual Products as Your Packing Type
Under Packing Type select Individual Products. This option is for shipments where you are sending a mix of different ASINs in each box or where unit quantities do not match standard case pack sizes. Case-Packed Products is for sellers sending identical units in sealed manufacturer cases — for most wholesale sellers starting out Individual Products is the correct and simpler choice.
Enter Exact Unit Quantities for Each ASIN
In the Units column enter the exact number of sellable units you are sending for each ASIN. Do not estimate or round — count your stock before entering this number and double-check it. If you are including multiple ASINs in the same shipment add each one using the Add Products button and enter the correct quantity for each. The total across all ASINs in your plan is what Amazon will expect to receive.
Confirm Who Will Prep and Label the Products
For each product Amazon asks whether you or Amazon will apply FNSKU labels. Select Merchant for self-labelling — you apply the labels before dispatch. Select Amazon only if you are sending unlabelled units and want Amazon to label them at the warehouse for a per-unit fee. For most wholesale sellers self-labelling is faster cheaper and gives you full quality control over every unit before it leaves your hands.
Confirm Prep Category if Prompted
For certain product types Amazon will prompt you to confirm a prep category — for example whether the product needs to be poly-bagged bubble-wrapped or prepared with a suffocation warning. Select the appropriate prep category for each product. If a product requires prep you must confirm whether you or Amazon will perform it — again selecting Merchant is recommended to maintain quality control and avoid per-unit prep fees.
Click Confirm and Continue
Once all products quantities and prep options are confirmed click Confirm and Continue to proceed to Step 2 of the workflow. Amazon processes your entries and assigns your shipment to a specific fulfilment centre based on your ship from address product type and Amazon’s current network capacity. You cannot choose which fulfilment centre receives your stock — Amazon determines this automatically.
Step 4 — Review Fulfilment Centre Assignment and Print FNSKU Labels
Step 2 of the Send to Amazon workflow is titled Confirm Shipping. At this point Amazon displays the fulfilment centre it has assigned to receive your shipment — for UK sellers this is typically a centre in the Midlands or the North of England such as BHX1 in Birmingham or MAN1 near Manchester. Note the fulfilment centre code and address — this is where your boxes must be delivered. Do not change the destination.
This step also provides access to your FNSKU label download. Click Print Item Labels to download the PDF of your FNSKU labels for the quantities entered in Step 1. Print these labels before proceeding — you need to apply them to your units before entering box contents.
Step 5 — Enter Box Contents Information
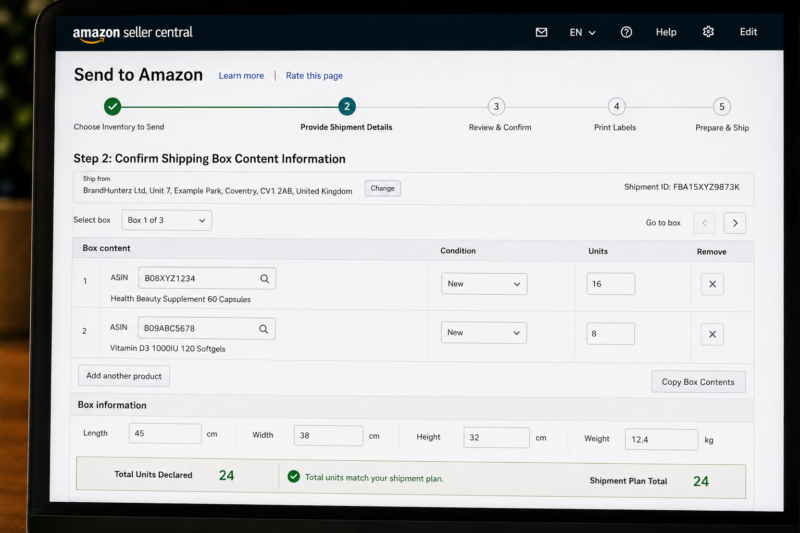
Entering box contents information is the step that most new sellers either skip entirely or complete incorrectly — and it is the step that generates the most costly compliance issues. Amazon requires you to declare the exact contents of every shipping box you send — which ASINs are in each box and how many units of each. This allows Amazon’s receiving staff to verify your shipment efficiently without having to open and manually scan every box.
| Box Content Option | How It Works | Recommended |
|---|---|---|
| Web form entry | Enter ASIN and quantity for each box directly in Seller Central — one box at a time | ✅ Best for small shipments |
| File upload | Download Amazon’s spreadsheet template — fill in box contents — upload completed file | ✅ Best for large shipments |
| Skip box content entry | No box content declared — Amazon manually scans all units at receiving | ❌ Compliance fee charged |
Select Enter Box Contents Via Web Form
Click Enter Box Contents and select the web form option. A box entry panel appears where you declare the contents of your first box. Click Add Box to begin entering the details for Box 1 of your shipment.
Enter ASIN and Quantity for Each Box
For Box 1 enter the ASIN and unit count for every product inside that specific box. If Box 1 contains 16 units of ASIN A and 8 units of ASIN B enter both rows. If all your boxes have identical contents you can use the Copy Contents feature to duplicate Box 1’s entries across all remaining boxes — saving significant time on larger shipments.
Enter Box Dimensions and Weight
For each box enter the packed sealed dimensions in centimetres — length width height — and the gross weight in kilograms including the box and all packing materials. Weigh and measure each box individually — do not estimate or use the same dimensions for different sized boxes. These figures are used to calculate your Amazon Partnered Carrier shipping cost and must be accurate.
Verify Total Unit Count Matches Your Shipment Plan
After entering all box contents Seller Central displays a running total of units declared across all boxes. Check that this total matches the quantity you entered in Step 1 exactly. If the totals do not match review each box entry and correct the discrepancy before proceeding. A mismatch at this point indicates either a data entry error or an actual physical counting error that must be resolved before dispatch.
Step 6 — Select Shipping Method and Book Courier
Once box content information is complete Seller Central presents your shipping options. For UK sellers sending small parcel shipments the two main options are Amazon’s Partnered Carrier through UPS or an independent courier service. Here is how each option works and when to use each:
| Shipping Method | How to Book | Best For |
|---|---|---|
| Amazon Partnered Carrier — UPS | Select in Seller Central — UPS collects from your ship from address — cost deducted from account balance automatically | Most standard shipments — competitive rates — integrated tracking — simplest process |
| Other carrier — DHL Evri Parcelforce | Select Other in Seller Central — book independently with your chosen carrier — enter tracking number manually into Seller Central | Heavier shipments or when independent carrier rates are lower than UPS Partnered rate |
Step 7 — Print Box Labels and Apply to Every Box
After confirming your shipping method Seller Central generates a unique box label for each box in your shipment. Each box label contains your shipment ID the box number and a scannable barcode that Amazon uses to identify the box at the fulfilment centre and link it to its recorded contents. Print every box label and apply one label to the largest flat face of each corresponding box before dispatch.
🚫 Critical Box Label Rules
Apply the correct numbered box label to the correct numbered box — Box 1 label on Box 1 Box 2 label on Box 2 and so on. Swapping box labels — applying Box 2’s label to Box 1 — causes a receiving discrepancy because the declared contents do not match the actual contents of the scanned box. Apply box labels on the largest flat side of each box away from any seam and do not place them over or near the courier tracking label.
Step 8 — Confirm Shipment Dispatched in Seller Central
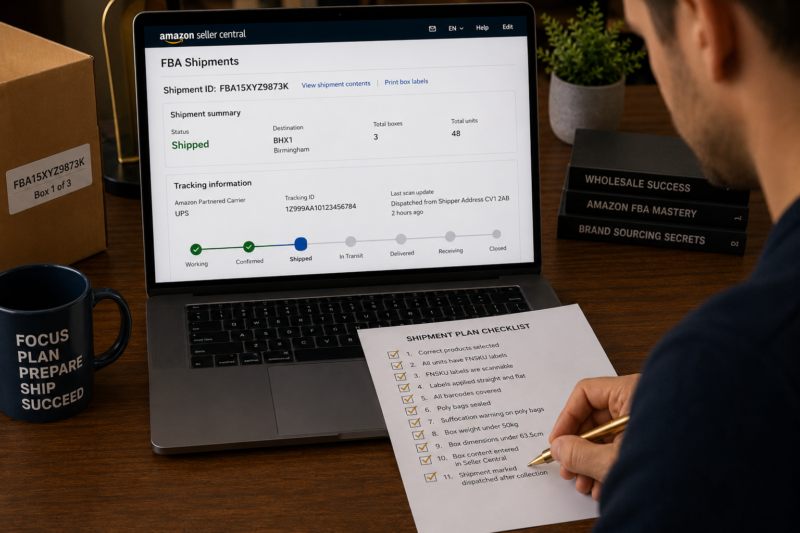
Once your courier has collected your boxes — or once you have dropped them at a UPS access point — return to Seller Central and mark the shipment as dispatched. This updates your shipment status from Working to Shipped and triggers Amazon’s receiving timeline. Never mark a shipment as dispatched before it has physically left your location — and never leave a shipment in Working status after the boxes have been collected as this delays your inventory going live.
Common Shipment Plan Mistakes and How to Avoid Them
| Mistake | Consequence | Prevention |
|---|---|---|
| Quantity in plan does not match units sent | Receiving discrepancy — Amazon holds investigation — units temporarily inaccessible | Count stock twice before entering quantity — verify box content totals match plan |
| Box content not entered — skipped | Box content compliance fee charged per unit — typically £0.15 to £0.25 per unit | Never skip box content entry — complete it for every box before confirming shipment |
| Wrong box label applied to wrong box | Declared contents do not match actual contents — receiving discrepancy raised | Apply Box 1 label to Box 1 immediately after printing — do not batch print and apply later |
| Inaccurate box dimensions or weight entered | Additional shipping charges applied after collection — or shipment refused if over limit | Weigh and measure every packed sealed box individually before entering dimensions |
| Shipment marked dispatched before collection | Amazon expects shipment — tracking not updated — investigation may be raised | Mark dispatched only after courier has collected or you have dropped boxes at access point |
The Complete Shipment Plan Creation Checklist
| Shipment Plan Step | Completed |
|---|---|
| Navigated to Send to Amazon via Manage FBA Inventory | ☐ |
| Ship from address entered correctly | ☐ |
| Individual Products packing type selected | ☐ |
| All ASINs added with exact unit quantities confirmed | ☐ |
| Merchant labelling selected — self-labelling confirmed | ☐ |
| FNSKU labels downloaded and printed at 100% scale | ☐ |
| Box contents entered for every box — ASIN quantity and dimensions | ☐ |
| Box content totals match shipment plan quantities exactly | ☐ |
| Amazon Partnered Carrier booked or independent courier confirmed | ☐ |
| Box labels printed and correct label applied to correct box | ☐ |
| Shipment marked dispatched in Seller Central after collection | ☐ |
| All steps completed — shipment in transit to Amazon FBA | ✅ Complete |
Conclusion — Follow Every Step in Order Every Time
Creating an FBA shipment plan in Seller Central is a process that rewards consistency and punishes shortcuts. Every step exists for a reason — the quantities to prevent discrepancies the box content entry to avoid compliance fees the box labels to enable accurate receiving. Follow the eight-step process in this guide in sequence on every shipment and the workflow becomes routine within three to four shipments.
Find your next wholesale product through our Brands Directory. Research every opportunity with Keepa. Confirm your margin with AMZScout. And create every FBA shipment plan following the process in this guide.
FIND YOUR NEXT WHOLESALE BRAND TO SHIP TO FBA
Browse 5,000+ Verified Wholesale Brands Free
Find verified wholesale trade contacts in the Brandhunterz Brands Directory — source your product apply for your account and create your FBA shipment plan following the complete process in this guide.
About the Author
This article is written by the team at Brandhunterz Ltd — a UK registered Amazon FBA wholesale sourcing company (Company No: 15342697) registered in England and Wales since 2023. Visit brandhunterz.com to learn more.